Exercise Technique – Clean Grip Power Pull from Deck
Joe Kenn
for Big House Power Professional Members
The Clean Grip Power Pull from Deck is a pulling variation derived from the Clean and Jerk. The Clean and Jerk is one of two movements that make up the competitive sport of Olympic lifting. In athletics, many different sports utilize numerous variations of this lift as well as training movements to enhance it.
The Clean Grip Power Pull from Deck is one of my favorite exercises to implement into a sport’s strength training program. I use as it as a standalone as well as a part of our teaching progression for the deck clean. It is a tremendous movement when done correctly to teach the athlete to achieve what we all desire, triple extension. Triple Extension is defined as extension of the Hip, Knee, and Ankle (actually plantar flexion).
Although the Clean is a very popular movement in sports, I believe it is one of the most often abused lift. Why? Coaches have bastardized technical proficiency for record board numbers. Let us remember, if triple extension is the final outcome we are looking for, do we necessarily need to catch the load? Yes, there is merit in receiving the bar in a clean, I understand this, but many athletes do not realize full triple extension when trying to achieve records lifts. This is why I recommend the Clean Grip Power Pull from Deck as an excellent substitute for the clean or as a supplemental movement for all total body movements.
I consider this a Hybrid movement. It combines two of the three main components of our teaching progression of the clean, the PUSH Phase and the JUMP Phase.
Before we begin the technique description, it should be noted that our incoming athletes go through three training cycles of 3-6 weeks in duration before they are introduced to this movement. We believe in the building process of the athlete or “slow cooking”. This allows us to introduce more challenging movements as the athlete is better prepared both mentally and physically because of the preparation preceding the next exercise in a particular movement category.
As far as programming goes, this movement is typically a Tier 3 Total Body choice. Depending of the Level of Athlete in our Quadrennial Plan our Total Body Movements for a micro cycle could be:
Tier 1 Session T Deck Clean
Tier 2 Sessions L Hang Clean
Tier 3 Session U Clean Grip Power Pull from Deck
Tier 4 Session T Push Press
Tier 5 Session L Dumbbell Single Arm Snatch
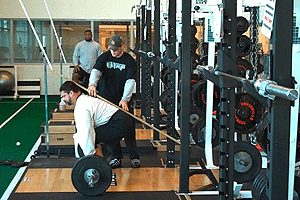
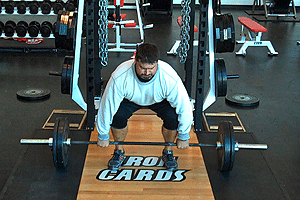
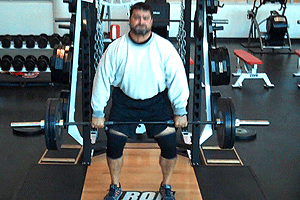
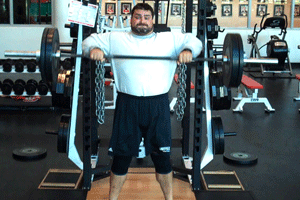
As with any movement or skill there is a fundamental starting position or “Stance”. This position usually will always have some derivative of the basic Athletic Position is the key to success. Start in a poor stance and a poor result will sure to follow. Start in a proper stance and you percentage for success escalates greatly.
Starting Position
 |
 |
| Starting Position – Alignment | Starting Position – Angle View |
 |
 |
| Starting Position – Front View | Starting Position – Angle View |
Step 1 – Foot Position
The feet should be parallel to one another and width should be dictated based on natural jumping stance. The whole foot should be in contact with the deck, with most of the force being applied through the ground by the balls of and mid foot.
Step 2 – Arm, Hand, Wrist Position/Grip
The arms are placed directly outside of the knees. They are fully extended at the elbow. Hand position is approximately a full thumb to slightly wider on bar away from the inside knurl line. I prefer the athlete to use a regular pronated grip to secure the bar but, I am not opposed to allowing the hook grip (thumb under fingers). I prefer the pronated grip because it simulates natural “grabbing” compared to the hook grip. Once the athlete has grabbed the bar I recommend a slight curling of the wrist towards the body. This will help keep the bar in proper alignment in relationship to the body during the action of the movement.
Step 2a – Bar Position
The bar is usually set up over the balls of the feet or closer to the shin. This allows for a more efficient push phase and takes the stress off the lower back but not letting the bar get out and away from the body.
Step 3 – Shoulder Position
The shoulders should cover the bar. This means that the shoulders are slightly over the bar. This is shown in the starting position alignment and side view photos and can be seen by drawing an imaginary line from the head of the deltoid to the end cap of the bar. You can see in the alignment photo that the shoulders are slightly rounded. This occurs because we have to set our hands on an object away from the mid-line of the body. This is almost necessary unless someone has longer levers and very good thoracic mobility.
Step 4 – Hip Position
The hips are pulled down and back after the athlete has positioned his hands on the bar. The hips are set below the shoulder and above the knee. This ensures the proper flexion needed to begin the push phase.
Step 4a – Low Back and Abs
Both of these areas should be isometrically contracted after taking in air into the stomach. This allows a “locked up” position of the hips in preparation for the Push Phase.
Step 5 – Chest Position
The chest should be raised so that the coach can see the upper chest when the hips are pulled down to position. A good cue is if an athlete is wearing a logo shirt, the coach is able to see the top 1/3 to ½ of the logo
Step 6 – Head Position
The head is set in a natural fixed position to start. The athlete wants to start any pulling movement from the floor with a close to neutral spine as possible. The athlete should not feel any pinching in the cervical spine that usually occurs when an athlete has his head raised and looking to the ceiling.
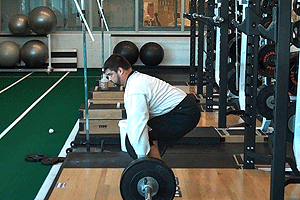
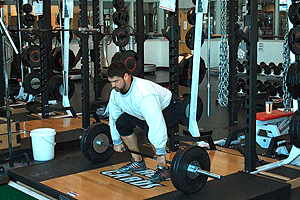
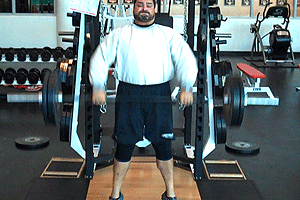
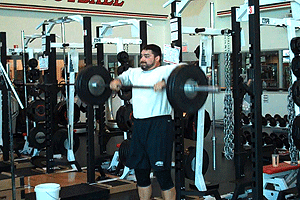
The Push Phase
 |
| The Push Phase – RDL Position |
Step 1 – PUSH!
The athlete has established the proper starting stance. The athlete begins the movement by pushing the mid foot through the ground [applying force]. The arms remained extended. The athlete continues to look through the brow and the chest is high. The shoulders are covering the bar and are above the hips.
The Push is a very precise movement. It should be very fluid and smooth. The Push is slightly slower than the next phase. As the bar continues to rise the athlete should begin accelerating the bar.
Note:
The main concern the coach should have when evaluating the push is when the athlete starts in a poor position and jerks himself down to the bar. Jerking down to the bar occurs when athletes think of this movement as a pull, and then jerk down and try to pull the bar off the ground with their arms. This usually leads to early extension of the hips and knees, therefore losing any chance of power/speed being generated and the shoulders usually begin lower than the hips. This leads to extreme stress on the lower back in a harmful way and leads to a poorly performed movement and a true waste of everyone’s energy.
The Push Phase is critical to a successful and efficient movement. Focus on applying force into the ground rather than jerking the bar off the deck is the major fault that has to be corrected immediately
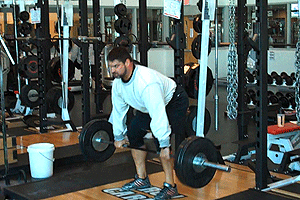
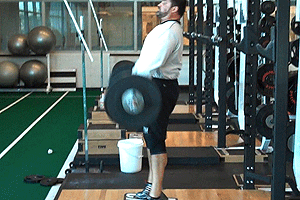
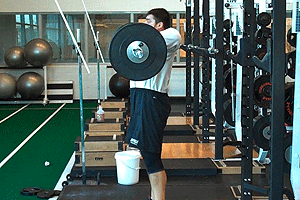
The Jump Phase
 |
 |
| Jump Phase | Jump Phase |
 |
 |
| Jump Phase – Extension | Jump Phase – Extension |
 |
 |
| Jump Phase – Extension | Jump Phase – Extension – Begin Pull |
Step 1 – JUMP!
As the bar clears the knees, it is GO TIME! Acceleration of the bar is critical. The coaching cue to the athlete is simple, JUMP! When discussing this with the athlete, I relay it very easily. You must jump with the intention of going up with for a 2 handed dunk.
The athlete needs to vigorously extend the hips and knees while rising on the toes [triple extension]. The arms will slightly break because of momentum at this point in the pull.
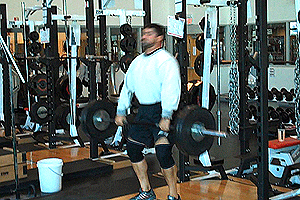
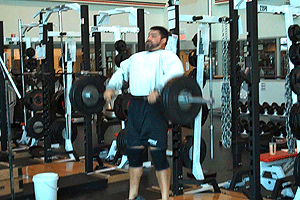
The Final Pull to Completion
 |
| The Final Pull to Completion |
 |
| The Final Pull to Completion |
|
| The Final Pull to Completion |
Step 1 – The Final Pull
The Final Pull begins when the athlete reaches triple extension. At this point, the athlete begins to pull the bar upwards until the upper arms are parallel to the deck. My coaching cue at this point is to “pull the bar through you, not to you”. This is where I consider this movement a stand alone. In the Olympic lifting technical progression of this type of movement, they would teach the athlete to pull themselves down to begin the catch phase of the squat clean.
OL coaches will argue that when the elbows bend the power ends. I won’t debate that. My goal for the final pull to completion is, to incorporate some upper body strength and size. Keep pulling and watch the development of the upper back group, in particular the posterior shoulder and trapezius muscle groups. These muscle groups are key to helping protect the cervical region/neck, which is critical in many sports.
As the athlete is pulling the bar to completion, his feet are settling back to full foot on the deck. The athlete releases the bar at completion. Hopefully, you have bumper plates. I recommend that they release the bar at its highest position so the athlete gets accustomed to finishing tall in the triple extension position.
WRAP UP
I will repeat that this is one of my favorite movements to incorporate with my athletes. The number one reason is because it has high transfer, especially in those athletes that have an explosive vertical component in the sport. Secondly, this can be performed by any athlete regardless of sport. It has a very high value in my exercise pool.
On my final note, remember we need to embrace proper technique in exchange for large numbers based on improper movement. The key is efficiency. An efficient movement at lighter loads will have a higher transfer rate than a poorly executed movement with heavier loads.
To discuss this movement please head over to the discussion board.